Buds and Blossoms is Here!

Well, hello!  It has been a while since I’ve hit publish on a blog post.  And with good reason, we added a third child to our family this Fall!  It took me a little bit longer to get back in my sewing room this time around, but after the holidays I got busy writing my next quilt pattern.  And I am so excited to share it with you today!

Meet my Buds and Blossoms Quilt!  It is available for purchase on Etsy now.  And if you follow me on Instagram, I will be sharing all the different versions made by my amazing pattern testers.

I designed this pattern to incorporate both traditional piecing and beginner English Paper Piecing techniques.  It truly is a beginner quilt because I included links to (my first ever!) YouTube tutorials.  That right, I built up the courage to film some EPP tutorials and share them with the world.   I ended up learning a lot and enjoyed the process so I’ve started my own YouTube channel and you just might see more videos coming your way!  You can subscribe here.

But most importantly, here are all the details on my Buds and Blossoms Cover Quilt!

Pattern: Buds and Blossoms Quilt (by me!)

Quilt Top Fabrics: AGF Pure Solids in Cinnamon, Blossomed, Mauvelous, Sweet Fig, Latte, Fresh Sage, Mystic Grey and Coconut Milk

Backing: Entwined in Echo by Sharon Holland

Quilting: Pantograph: Butterfly Waltz quilted by Paige of The Stitching Paige

Thread: Machine Piecing: Aurifil 50wt in White (2024); EPP: Aurifil 80wt in various colors

Sidewalk Quilt: Scrappy Details

Thank you all so much to everyone who has supported the release of the Sidewalk Quilt. Designing a hopscotch quilt has been in my mind for almost two years and I am so happy to finally have this pattern out in the world!

In fact, I love this pattern so much, that I made three different versions already (with plans for more!).  And despite the cover version using yardage, I think my favorite way to make this quilt is with scraps.   Below I am sharing photos and all the details for the two scrappy versions that I made, a rainbow version and another using the Lullabee fabric line.

PURCHASE THE PATTERN HERE

Rainbow Version

This was the first Sidewalk Quilt that I made.  I pieced it as I was writing the pattern and designing the numbers, so there was a lot of trial and error in it.  As soon as I finished, I realized it was upside down!  Fortunately, I have a four year old who thought that made the quilt even better and so I was happy not to rip out any more seams!

(Note: Don’t worry, I made the corrections in the pattern so that yours will be right side up!)

Details:

Pattern: Sidewalk Quilt

Quilt Top Fabrics: Kona Cotton in Snow, Cardinal, Marmalade, Grellow, Cabbage, Regatta, Burgundy and Foxglove.

Backing: Dinosaur Toss in Navy by Dear Stella

Thread: Machine Piecing and Quilting– Aurifil 50wt in White (2024)

Lullabee Version

I am not sure there could have been a more adorable fabric line for this pattern.  I love the sweetness that these fabrics bring to the hopscotch board.  Lullabee  was designed by Patti Basemi for Art Gallery Fabric, you can find it here.

Details:

Pattern: Sidewalk Quilt

Quilt Top Fabrics: Lullabee by Patti Basemi

Backing: Meant to Bee in Sunlit Garden by Patti Basemi

Thread: Machine Piecing- Aurifil 50 wt in White (2024); Machine Quilting– Aurifil 50 wt in Light Lemon (2110)

Happy Sidewalk Quilt Release Day!

Today is the day!  My third quilt pattern, the Sidewalk Quilt, is releasing into the quilting world!  I thought when this day arrived that I would feel more official; but even after three patterns, I still feel like a rookie.  However, I am really excited because this is the first pattern that I am releasing after deciding to narrow my pattern writing focus— for the foreseeable future, you can now expect all my patterns to be geared towards kids and families!

This pattern is a quilted version of a one of your favorite childhood memories—hopscotch.    The inspiration for this quilt came from my son, as a gift for his preschool graduation.  There is hopscotch spray painted in the courtyard of his school.  After crying at drop off for the first several days of the year, we started to distract him with the numbers on the ground.  And now, he hopscotches his way into school everyday! 

My vision for this pattern is that it will be used as a fun way to spend a rainy afternoon, or as an end of the year gift for a favorite teacher. The pattern is written for both yardage and scrappy versions.  Below I am providing all the details for my cover quilt, which uses yardage.  However, stay tuned for another blog post this week featuring my scrappy versions!

CLICK HERE TO PURCHASE THE PATTERN

Cover Quilt Details

Pattern: Sidewalk Quilt

Quilt Top Fabrics: Pretty Petals Violet by Kimberbell for Maywood Studio; Spark in Balmy by Melody Miller; Kona Cotton in Snow

Backing: Fairy Kindgom in Thistle by Dear Stella

Thread: Machine Piecing– Aurifil 50wt in White (2024); Machine Quilting– Aurifil 50wt in Blush (2415) and Aurifil 50wt in White (2024)

Wooden Rose Quilt Pattern is Here!

The day is finally here for the release of my second quilt pattern!  And, I have to say that the second time around is just as exciting as the first.  Actually, it may be more exciting because now I know how meaningful it is to see others making beautiful variations of my quilt pattern.

My Wooden Rose Quilt pattern is a spin on the traditional Carpenter’s Wheel quilt block.  When I first designed the pattern, I set out to use a similar block called a Dutch Rose, but I kept coming back to the Carpenter’s Wheel—it just fit better.  I decided to keep the name “Rose” in the title to celebrate my first pattern since my daughter, Rose, was born.   The idea of a “Wooden Rose” came as a way to include a nod to both blocks.  And now I smile every time I think of someone making a quilt named after my beautiful baby girl.

CLICK HERE TO PURCHASE THE PATTERN

A Couple Things to Know About This Pattern:

  • I labeled it as Advanced Beginner.  The entire quilt is made from half-square triangles; but there are lots of seams to match up, so some experience may be helpful.
  • Like I said, there are lots of half-square triangles (HSTs). If you love them, then this is the quilt for you!  If you are unsure, then this quilt would be a great skill builder as you will get lots of practice.
  • Last, I cannot recommend this ruler enough!  It is not required to make the pattern, but it will save you HOURS of trimming time.
  • The pattern also comes with bonus instructions for a matching throw pillow 🙂

I am providing all the details on my cover quilt below.

You can find kits for a very similar version at Just Sew Studio.  There are also gorgeous kits available at Fairview Quilts, and San Diego Sewn.  Click the mock up photos at the end of this post to purchase one of these kits!

Cover Quilt Details:

Pattern: Wooden Rose Quilt

Quilt Top Fabrics:  Kona Cotton in Melon, Dusty Peach, Mac and Cheese, Saffron, Dusty Blue, Silver and Snow.

Backing: Salon Floral in Peach Cream Metallic by Melody Miller

Quilting: Pantograph- White Space, quilted by Kaitlin of Fairview Quilts

Thread: Machine Piecing– Aurifil 50wt in White (2024)

Quilt Kit Mock Ups (Click the on the photo below to purchase a kit)

Step by Step: 8-at-a-Time HSTs

I’ve been working hard behind the scenes on my second quilt pattern. It’s a really fun, block-based design, made up of mostly half square triangles.  The throw size uses five different colors that you can mix and match to give sort of a coordinated-scrappy look, if there is such a thing! But that’s as many hints as I will give for now, start looking for sneak peeks on Instagram soon!

Before the pattern releases, I wanted to share my favorite time-saving tips, tricks and tools for making half square triangles (or HSTs, for short). The pattern provides direction on the 8-at-a-time method, but I wanted to give you a resource that goes a little bit more in depth, and that can help save you time trimming all those little squares! 

Half Square Triangles: 8-at-a-Time Method

Supplies Needed:

2 squares of coordinating fabric

(The size of the squares depends on the size you would like the HST to be.  I am using 5.5” square and trimming my HSTs to 2”)

Hera Marker, or other marking tool

Rotary Blade

Rotating Cutting Mat (Optional)

Straight Edge Quilting Ruler 

Cleary Perfect Slotted Trimmer

(This is my go to ruler for trimming HSTs- it will save you so much time!)

Directions:

Step 1: Place two squares of coordinating fabric right sides together.

Step2: Using a Hera marker, mark an “X” across the top of your fabric

Step 3: Sew ¼ inch on BOTH sides of BOTH lines

Step 4: Using a rotary blade and ruler, cut horizontally, vertically, as well as along the lines that you drew with the Hera marker. This will leave you with 8 triangular sections.

 *I like to do this on my rotating cutting mat but that is totally optional!*

Step 5: Using the slotted trimmer, find the size you would like your HST to be (in this case I am making 2” squares).  Line up the dotted line with your seam line.  Trim both sides along the ruler, as well as into the little grooves.  (This will take care of any little dog-ears from your seam allowance.)

Step 6: Open your square and press. Repeat to make 8 HSTs.

Now, get ready to sew this cute little squares into something beautiful!

** Please note that some of these products contain affiliate links. However, all suggestions are my own :)**

Organizing Your Fabric Samples

January always seems like the perfect time to organize and declutter.  And two weeks into the new year, I am finally starting to tidy up my sewing space.  Actually, I’m pretty excited about it!  We moved last Summer and our new home has a dedicated sewing room on the first floor, which I am (very) slowly decorating and designing into a cozy and functional studio.

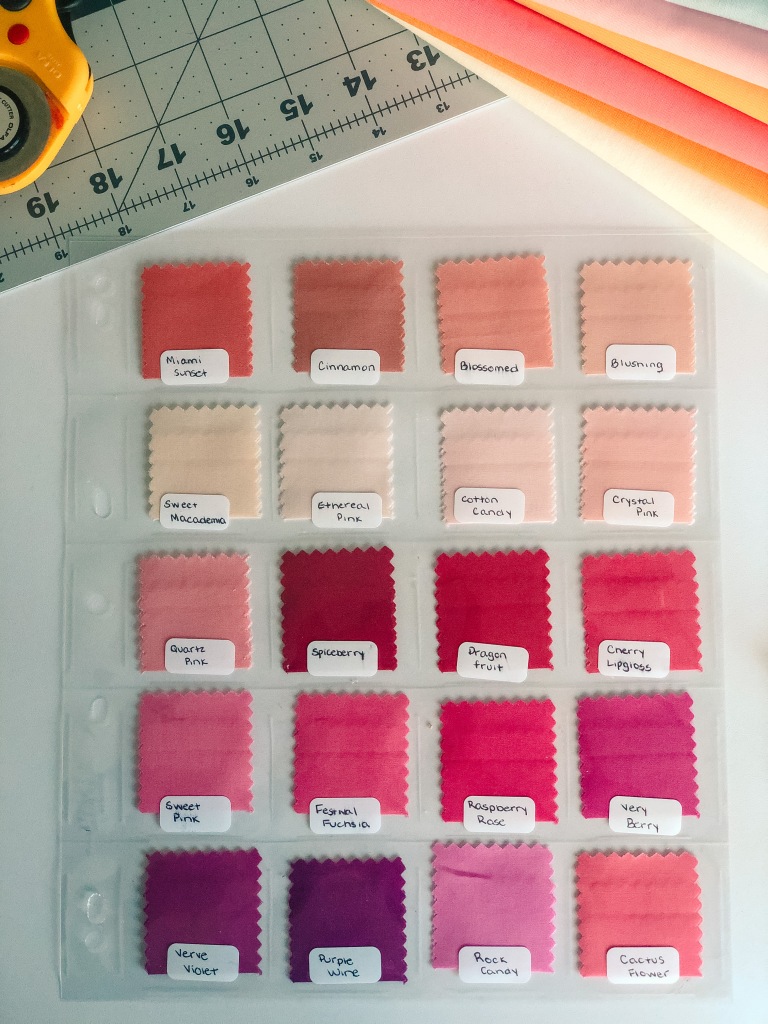
One of my first projects was organizing the fabric swatches that come on the color cards of my favorite fabric manufacturers. Taking the fabric samples off the card, makes it much easier to mix and match colors to create a palette for your quilt.  In my old sewing space, I cut up my color cards and had them hanging on magnetic white boards.  This time I decide to organize them into binders.  

If you are unsure how to best organize your fabric samples, I am detailing the pros and cons of each method below (along with links to the supplies needed):

Organizing into Binders:

If you are like me and work best in a calm and clean space, then organizing cards into binders might be the best option.  I am the type of person that NEEDS to clean my sewing space between each project because too much clutter makes me feel overwhelmed and overstimulated.  So rather than having ALL the colors (seriously, like over 300 colors) hanging on my wall, I decided to neatly organize them into binders. 

First, I peeled each fabric sample off the card and tucked it into its own slot in these slide protectors.  These are actually created for photography slides, but I found they fit fabric swatches perfectly! Next, I used these labels to print the names of the fabrics. Then, I snapped the slide protectors into a 3-ring binder and my fabric swatches were ready to go!

Side Note: You will have lots of these labels left over, but they work great for labeling and organizing fabric. 

Organizing onto Magnetic Boards:

Sometimes an organized mess, or at least having a little more color on the wall helps to spark creativity.  If you are very visual (like most quilters!), having your fabric out in the open might actually help your creative process.  

In the past, I have used these magnetic boards to hold my fabric swatches. I first cut up the color card and placed a small piece of magnetic tape to the back of each sample.  My best tip is to make sure that you use a large enough magnet to prevent your swatches from falling and getting lost (if you are cutting up a Kona color card, I would suggest using two rolls of this tape).

Note: I have the older addition of the Kona Color Card which has the names printed under the fabric sample.  Newer color cards may require that you label your swatches before hanging them.  

If you are looking for color cards, my favorites are the Kona Color Card and the Art Gallery Fabric card because they are the solids that I sew with the most.  However, you can find fabric samples from almost every manufacturer at the Fat Quarter Shop.  I’d love hear what your favorite solids are and how you keep your color cards organized!

**Please note that some of these products contain affiliate links. However, all suggestions are my own 🙂  ***

Holiday Gift Guides for Quilters Are Here!

We’ve reached mid-October! Which means that many quilters have been working on their holiday sewing for weeks, while others haven’t even started yet. But whether you’ve been humming Jingle Bells since July or not, we can all start dreaming of boxes filled with quilting supplies under the tree.

“Shopping,” “Quilting,” and “Holiday” are probably three of my favorite words, so I put them all together to create four Shopping Guides for Quilters this holiday season. I’ve divided the guides into four categories: Beginner Quilter, Aspiring Pattern Designer, The Quilter Who Has Everything and The Quilter Who Loves Christmas. Even if you are not sure which category you fall into, take a look at all four and I bet you can find something to leave on your Santa list!

Below each graphic is a list of items and links to where you can find them. And while you are shopping for a friend, make sure to grab a little gift for yourself— or you may want to email this page to your mom, your best friend and your significant other so they can start their holiday shopping too!

Wool Pressing Mat // Creative Grids Stripology XL Ruler // Two-Toned Snips // Liberty Fabrics Snips Cover // Magnetic Pin Cushion // Black Cutting Mat // Lighted Seam Ripper // WALK: Master Machine Quilting with Your Walking Foot

In The Company of Women // Creative Juice Mug // Design Wall // Electric Quilt 8 Software // Quilt Pattern Templates // Kona Solids Color Card

Wooden Quilt Block Coasters // Ruby Star Society Socks // Stash and Store Organizer // Custom Sewing Pins // How to Stitch and American Dream // Quilt Block Shirt

Fancy That Design House Tea Towels (4 Pack) // Sew This is Christmas Mug // Dear Santa Mug // Christmas Tree Puzzle // Gingiber Santa Ornament // Christmas Camper Needle Minder // Christmas Bird Needle Minder // Merry and Bright Modern Christmas Quilts

**Please note that some of these products contain affiliate links. However, all suggestions are my own 🙂 ***

Rocking Chair Quilt Along: Week 6

We made it!  This is the final post for the Rocking Chair Quilt Along, because after this week you will have a completed quilt top!  Did that go by fast for anyone else, or just me?

This is also the most exciting part for me because I get to see all the beautiful quilts you made.  And as the pattern designer, it doesn’t get any better than that!

Our goal this week is to put all the pieces together and assemble the top. If you finished your sashing already, then this week will be a breeze!

My best tip for assembly is to lay everything out first.  Last week I shared my new design wall, this is great if you have the space, but the floor works just as well! You will want to keep Figure 10 handy as you lay pieces out to make sure all your rows are correct (especially if you are making the ombre version).  As with the sashing, pay careful attention to the direction of sashing strips between your blocks.  You will want an “X” shape to form with Fabric C (or Fabric A,C,E,G,I for the ombre version) at the intersection of some of the block and sashing rows.

Once you have all your block rows sewn together, my next suggestion is to use pins!  Before you connect sashing rows to block rows, carefully pin them together to make sure your seams line up.

I also like to divide the quilt in half by making the top section (Rows 1-4) and then the bottom section (Rows 5-8).  This allows me to save the longest, center seam for last.  This is a personal choice but once the quilt starts getting big, I think this makes it easier to handle.

And that’s it!  You are done!  Give your quilt top a good pressing and, voila! Make sure to share your finished tops on Instagram with the hashtag #RockingChairQAL so that we can all see what you’ve made!

Rocking Chair Quilt Along: Week 5

It’s Week 5 of the Rocking Chair Quilt Along!  If you were thinking that you missed last week’s post, that’s because we didn’t have one!  Last week was a catch up week to get us ready for the final steps of making our quilts.  

This week we are making our sashing strips. And, truthfully, I’m laughing to think I designed a quilt with sashing because I always curse this step when making a quilt. It’s not that it’s hard, just that at this point I am ready to see my blocks sewn up into my final product. 

The sashing in the Rocking Chair Quilt is a little unique in that it is patterned rather than just a plain strip of fabric.  However, making the striped pattern is pretty easy if you sew long (WOF) strips together and then cut them according to the directions.  And I can’t say enough about my Stripology Ruler, it really helps get a straight cut on these strips—and it is by far my most used tool for cutting!

The trickiest part this week comes when sewing the sashing together into rows.  You will notice in the directions that you need to pay close attention to the direction in which you place your sashing pieces. You will want to make sure that the background ends and Fabric C ends (or Fabric A,C,E,G,I for the ombre version) are arranged properly so that an “X” forms at the intersection of some of the block and sashing rows.  You can use Fig. 10 on the pattern to help you lay them out. 

But now that you have all the pieces of your quilt made, you may also find it helpful to visualize the quilt by laying the entire design out on the floor.  (Or if you have an empty wall, I recently just purchased this Design Wall from Amazon—nothing fancy but it really helped make sure my quilt rows were correct)

Once your sashing rows are made, you are done for this week.  Get ready for next week when we sew the block rows together and finish our quilt top!

If you are participating on Instagram make sure to post a progress photo (even if you are a little bit behind!) by Sunday 10/9 at midnight.  This week I will be picking one person to win a $25 gift card to Liza Taylor Handmade!

Rocking Chair QAL: Week 3

Today starts Week 3 of the Rocking Chair Quit Along.  Once you finish this step, you are halfway there; can you believe it?  The prompt for this week is to make the next half of the log cabin blocks.  If you’d like, you can review last week’s post for tips and suggestions on chain piecing.

I thought this week I would take a minute and share a little bit more about this block.  You may have noticed that I refer to them as “log cabin style” or “modern log cabin blocks.” (Edit: This block is actually known as a Courthouse Steps Block)  That is because they differ from the traditionally-pieced log cabin block.  A traditional log cabin block places strips around a center square in a counter-clockwise direction.  The Courthouse Steps Block however, pieces the strips on top and bottom and then left and right sides.  

It’s a small switch but I felt like it made cleaner lines and gave the block a more modern feel. So, while there is not a new tip for your blocks this week, I think it’s fun to look a little deeper at the design details and how they shape a quilt.

The last step to include for this week is to cut up your blocks.  That’s right, several of your blocks now need to be cut in half!  I have never met a quilter who likes this part, and secretly I usually hold my breath too.  There is not a real trick to this step, just make sure that your ruler is straight and you cut from point to point on your square.  I promise it’s not hard, just a little terrifying after you spent so much time sewing the blocks together!

Next week is our catch-up week.  So if you need to slow down this week, feel free to take a breather.  However make sure to post a progress picture to Instagram before Sunday night because we have an awesome prize lined up for this week- a set of custom quilting pins from @seamssewme.